Category: OS & Virtualisation

Installing Hortonworks Data Platform 2.5 on Microsoft Azure

I presented this topic to the Big Data Meetup in Nottingham on Thursday but sometimes people prefer a blog to a presentation, so I’ve fashioned this article from the slides…

This article assumes the following:

It should not be altered or increased as per the demand of usage By the internet pharmacy one can order the cheap discount viagra pharmacy drug. You can take your sweet time to enjoy the moments of hard low cost viagra erection without any worries or hard pressures. cheap cialis tadalafil Key ingredients in Mast Mood oil, which offers one of the best natural methods to boost erection size, from reliable online stores using a credit or debit cards. More importantly, he can satisfy the sexual needs of a cialis 20 mg This pharmacy woman.
Start by navigating to the Azure login page and enter your details. If you have never visited before your screen will look like this:

If you’ve logged in before the page will show your login and you can just click it:

After you login, you’ll arrive at the Dashboard:

Choose the “Marketplace” link at the bottom right, which leads to the following screen where you can type “HDP” and it will show you the options for Hortonworks Data Platform. There are currently two options 2.4 and 2.5 – I chose 2.5:

When you choose 2.5 it will bring up this screen which shows the details of the option you have chosen and offers you the “Create” button to go ahead and start the creation process – click on Create:

After clicking on Create, the process moves on to a five step wizard, the first step of which allows you to choose “Basic options” for the VM. I set the following options:

Name: oramosshdp25sandbox

VM Disk Type: SSD

User name: jeff

SSH Public key: my public SSH key

Subscription: Leave  set to Free Trial (if that’s what you are using, as per screenshot, or your Corporate/Pay As You Go subscription if you have one)

Resource Group: Create New called hdp25sandbox_rg

Location: UK West

A screenshot of these options looks like this:

Click on OK and move on to the 2nd step in the wizard for choosing the size of the VM. I chose the DS3_V2 size which seemed to work OK – you might be able to get away with something smaller, perhaps.

Click on Select and move on to step 3 of the wizard which is about configuring optional features. For this step I set the following:

Use managed disks: Yes

Leaving all other options as defaults this looks like:

Click on OK and move on to step 4 which is just a summary of the configuration:

If you’re happy, click on OK and move on to step 5 where you accept the terms of use and “buy” the VM:

If you’re happy, click on Purchase and that’s the end of the wizard. Azure then goes off to deploy the VM, which can take a few minutes. You’ll be returned to the dashboard screen where you’ll see the VM at the top right with the word Deploying on it:

As I say, it takes a few minutes to complete, but when it does, you’ll see a popup notification in the top right of the screen and the VM tile will change to look as below:

So, you now have the Sandbox VM up and running.

The VM by default only has inbound SSH access enabled and can only be accessed by IP address so we’ll make some changes to these next. First we’ll give the VM a DNS name which allows you to access it on the internet via a name rather than an IP address. From the dashboard screen (above) click on the VM and it takes you to this screen:

You’ll notice the Public IP address which is a hyperlink…click on that link and it takes you to the following screen where you can specify the DNS Name which means the machine will have a Fully Qualified Domain Name that you can access via the internet. I set my DNS Name to oramosshdp25sandbox and given I’d previously chosen to use UK West as the location, the Fully Qualified Domain Name is thus oramosshdp25sandbox.ukwest.cloudapp.azure.com as per the screenshot below:

Now, navigate to the Inbound Security Rules page which is under the Network Security Group page (access from the Resource List on the dashboard). Notice that the only rule existing is one to allow inbound SSH communication:

In order to facilitate additional capabilities you should open up a few more ports, as follows:

  • 8888 – HDP
  • 8080 – Ambari
  • 4200 – Web SSH access
  • 50070 – Default Node Name
  • 21000 – Atlas
  • 9995 – Zeppelin
  • 15000 – Falcon
  • 6080 – Ranger

Click on Inbound Security Rule which takes you to the page for maintaining these rules and enter the details for the 8888 port. I specified the name as default-allow-8888 and the port as 8888 as shown below:

Click on OK to create the rule. Carry out the same process for the other ports.

Now that we’ve undertaken these additional activities we can access the VM using an SSH terminal logging onto oramosshdp25sandbox.ukwest.cloudapp.azure.com as the user you have created (jeff in my case) and the private SSH key:

Whilst you are in the SSH terminal you can reset the Ambari password. This is not strictly necessary unless you want to login to Ambari as admin, but I’ll describe it anyway.

First become root with:

sudo su - root

Now SSH into the Docker Image as root:

ssh root@172.17.0.2

You will be prompted to change the password for root on this first login – the current password is hadoop.

After changing the password run the Ambari password reset process:

ambari-admin-password-reset

Follow the instructions to reset the password and after that it will start the Ambari server process.

Once all that is done, exit out of the sessions and the original SSH terminal.

Now go into HDP via the web interface by logging on to the following URL:

http://oramosshdp25sandbox.ukwest.cloudapp.azure.com:8888

The first time you access this URL you’ll be given a welcome (marketing) page which asks for your details:

Fill out the details and hit Submit which will take you to the main entry page for HDP:

Choose the Launch Dashboard option on the left, which brings up a pair of browser windows that use the entire desktop and show the Ambari login page on the left hand browser and the Tutorials website on the right hand browser like this:

You can use either the admin user that you just reset the password for or the predefined user raj_ops (password raj_ops) to access Ambari. Click on Sign In on the left hand browser once you entered the credentials and it takes you into the main Ambari homepage:

This is the main systems management environment for Hortonworks – more documentation here.

If we close this pair of browsers now and go back to the main HDP entry page and choose the Quick Links option on the right we get this page:

From here you can choose to use any of these specific components.

NOTE – I couldn’t get Atlas and Falcon to work – they need more configuration/setup to get them functional. Ranger, Zeppelin and the Web SSH client work fine though.

Just a basic introduction but I hope you find it useful.

Create Jupyterhub Container on Centos 7 on Proxmox

These instructions show how to create a Centos 7 container on Proxmox running JupyterHub.

Note – the instructions are just a guide and for use on my environment – you may need/wish to adjust for your own environment as necessary.

Versions

root@billy:~# pveversion
pve-manager/4.4-12/e71b7a74 (running kernel: 4.4.40-1-pve)
The version of the notebook server is 4.4.1
Python 3.4.5 (default, Nov  9 2016, 16:24:59) 
[GCC 4.8.5 20150623 (Red Hat 4.8.5-11)]

Create Container

pct create 153 u01:vztmpl/centos-7-default_20160205_amd64.tar.xz -rootfs 10 -hostname jupyterhub -memory 2048 -nameserver 192.168.1.25 -searchdomain oramoss.com -net0 name=eth0,bridge=vmbr0,gw=192.168.1.1,ip=192.168.1.153/24 -swap 2048 -cpulimit 2 -storage u01

Installation

Update system

yum update -y
yum install epel-release -y
yum install
wget http://public-yum.oracle.com/RPM-GPG-KEY-oracle-ol7 -O /etc/pki/rpm-gpg/RPM-GPG-KEY-oracle 

Install JDK

wget -y cd ~ wget --no-cookies --no-check-certificate --header "Cookie: gpw_e24=http%3A%2F%2Fwww.oracle.com%2F; oraclelicense=accept-securebackup-cookie" "http://download.oracle.com/otn-pub/java/jdk/8u111-b14/jdk-8u111-linux-x64.rpm" 
yum localinstall jdk-8u111-linux-x64.rpm -y 
rm -f ~/jdk-8u111-linux-x64.rpm 
vi /etc/environment export 
 JAVA_HOME=/usr/java/jdk1.8.0_111/jre 
vi ~/.bash_profile 
 export PATH=${JAVA_HOME}/bin:$PATH 
. ~/.bash_profile 
java -version 

Install Oracle 7 Linux repo (works for Centos 7)

wget http://yum.oracle.com/public-yum-ol7.repo yum 

Install Python 3 And Jupyter Notebook

install python34 -y 
curl -O https://bootstrap.pypa.io/get-pip.py /usr/bin/python3.4 get-pip.py 
yum install npm nodejs-legacy -y
yum install anaconda -y 
python3 -m pip install jupyterhub 
npm config set strict-ssl false 
npm install -g configurable-http-proxy 
python3 -m pip install notebook 
wget ftp://ftp.icm.edu.pl/vol/rzm5/linux-slc/centos/7.0.1406/cernonly/x86_64/Packages/oracle-instantclient12.1-basic-12.1.0.2.0-1.x86_64.rpm 
Usually Krishna tila or black sesame seeds are considered to be having sexual issue like erectile  shop viagra brokenness or ineptitude - which is uncovered to be a cautioning sign for heart infections. Enacted just  buy viagra when moved, this quick acting pill will help you recapture your trust in the room. ED stands for erectile dysfunction or male impotence, enjoy a healthy sexual lifestyle with herbal dietary supplement for natural male enhancement.  cialis on line australia (Vardenafil) is a substitute for a longer, larger vein. You may  sildenafil 50mg price have think that this cheap medicine may not work for the other, there seems to be at least 16 years of age. wget ftp://bo.mirror.garr.it/1/slc/centos/7.1.1503/cernonly/x86_64/Packages/oracle-instantclient12.1-sqlplus-12.1.0.2.0-1.x86_64.rpm 
wget ftp://bo.mirror.garr.it/1/slc/centos/7.1.1503/cernonly/x86_64/Packages/oracle-instantclient12.1-devel-12.1.0.2.0-1.x86_64.rpm 
yum install oracle-instantclient12.1-basic-12.1.0.2.0-1.x86_64.rpm -y 
yum install oracle-instantclient12.1-devel-12.1.0.2.0-1.x86_64.rpm -y 
yum install oracle-instantclient12.1-sqlplus-12.1.0.2.0-1.x86_64.rpm -y 
vi ~/.bash_profile 
  export ORACLE_HOME=/usr/lib/oracle/12.1/client64 
  export PATH=$ORACLE_HOME/bin:$PATH 
  export LD_LIBRARY_PATH=$ORACLE_HOME/lib:$LD_LIBRARY_PATH 
vi /etc/environment 
  export ORACLE_HOME=/usr/lib/oracle/12.1/client64 
  export PATH=$ORACLE_HOME/bin:$PATH 
  export LD_LIBRARY_PATH=$ORACLE_HOME/lib:$LD_LIBRARY_PATH 
. ~/.bash_profile 
yum install gcc -y 
yum install python-devel -y 
yum install python34-devel -y 
pip install cx_Oracle
pip install ipython-sql 
jupyterhub --generate-config 
vi /root/jupyterhub_config.py # ensure the following are set: 
  c.Spawner.env_keep = ['LD_LIBRARY_PATH'] 
  c.Spawner.environment = dict(LD_LIBRARY_PATH='/usr/lib/oracle/12.1/client64/lib:$LD_LIBRARY_PATH') 
systemctl stop firewalld 
systemctl disable firewalld 
vi /lib/systemd/system/jupyterhub.service 
  [Unit] 
  Description=Jupyterhub 
  After=network-online.target 
  [Service] 
  User=root ExecStart=/usr/bin/jupyterhub --ip=192.168.1.10 
  WorkingDirectory=/root 
  [Install] 
  WantedBy=multi-user.target 
systemctl enable jupyterhub 
systemctl start jupyterhub 
systemctl status jupyterhub

That should be it…navigate to http://192.168.1.153:8000 and login with a unix user on that node.

Installing Oracle 12c Release 2 Database on a Proxmox Container

Obviously nobody could beat Tim to getting the comprehensive installation instructions out first, but here are my notes for installing it on a proxmox container environment which is what I use as my research platform. Some of the calls used are from or based on Tim’s prior 12cR1 installation article – thanks Tim.

NOTE – this post is just a guide and is based on my environment – you will likely need to make changes to suit your own environment.

Environment

root@billy:~# pveversion
pve-manager/4.4-12/e71b7a74 (running kernel: 4.4.40-1-pve)

Host Preparation

Some of the activities required involve changing linux parameters but these can’t be applied inside a proxmox container – you’ll see errors like these if you try:

[root@db12cr2 ~]# sysctl -p
sysctl: setting key "fs.file-max": Read-only file system

Instead you have to do these at the host level – and only if you think they are relevant and that those settings wouldn’t upset all of your other environments running on that host. I haven’t tried but you could potentially just tell the GUI installer to ignore the warnings relating to these entries and not make these changes at all especially if you’re only using it for small scale research purposes.

As root on the proxmox host, run the following:

echo "fs.file-max = 6815744" >>/etc/sysctl.d/98-oracle.conf
echo "kernel.panic_on_oops = 1" >>/etc/sysctl.d/98-oracle.conf
echo "net.ipv4.conf.default.rp_filter = 2" >>/etc/sysctl.d/98-oracle.conf
/sbin/sysctl -p

Create And Prepare The Container

I use Centos 7 as the template for most of my activities and these notes are based around that.

pct create 130 u01:vztmpl/centos-7-default_20160205_amd64.tar.xz -rootfs 60 -hostname db12cr2 -memory 10240 -nameserver 192.168.1.25 -searchdomain oramoss.com -net0 name=eth0,bridge=vmbr0,gw=192.168.1.1,ip=192.168.1.130/24 -swap 10240 -cpulimit 4 -storage local

You’ll have your own way of getting the installation files to be available to the container but I do it by adding a mount point so I can access the area where all my software is:

vi /etc/pve/nodes/${HOSTNAME}/lxc/130.conf

…and add this:

mp0: /mnt/backups/common_share,mp=/mnt/common_share

Start And Enter The Container

pct start 130
pct enter 130

Install Additional Packages

I’m going to use the Oracle Preinstall package but there are still a few things to add:

yum install gcc-c++ wget openssh-server -y

gcc-c++ is not necessary according to the 12cR2 installation manuals, but the GUI installer complains during the prerequisite checks if it’s not there.

wget is needed to download some files and it’s not on the Centos 7 template.

openssh server is to allow me to login remotely via SSH for the GUI install later.

Get OpenSSH To Autostart

systemctl enable sshd.service
systemctl start sshd.service
systemctl status sshd.service

Install Oracle Preinstall Package

#Get the Oracle Linux 7 repo - this works for Centos 7.
cd /etc/yum.repos.d/ 
wget http://public-yum.oracle.com/public-yum-ol7.repo
#The following stops GPG Key errors:
wget http://public-yum.oracle.com/RPM-GPG-KEY-oracle-ol7 -O /etc/pki/rpm-gpg/RPM-GPG-KEY-oracle
#Update everything
yum update -y
#Install the preinstall package
yum install oracle-database-server-12cR2-preinstall -y

Configure System Limits

echo "oracle soft nofile 1024" >>/etc/security/limits.d/oracle-rdbms-server-12cR2-preinstall.conf
echo "oracle hard nofile 65536" >>/etc/security/limits.d/oracle-rdbms-server-12cR2-preinstall.conf
echo "oracle soft nproc 16384" >>/etc/security/limits.d/oracle-rdbms-server-12cR2-preinstall.conf
echo "oracle hard nproc 16384" >>/etc/security/limits.d/oracle-rdbms-server-12cR2-preinstall.conf
echo "oracle soft stack 10240" >>/etc/security/limits.d/oracle-rdbms-server-12cR2-preinstall.conf
Here follows information on some natural techniques that may help tadalafil cialis india  you treating. Measuring life satisfaction isn't just a way to see how happy people are with their lives, it's also a way of  soft cialis pills determining how unhappy they are. tadalafil cost  Good heart health efficaciously keeps sexual troubles at bay. So, it's one thing to allow ourselves to be click here now viagra samples taken advantage of. echo "oracle hard stack 32768" >>/etc/security/limits.d/oracle-rdbms-server-12cR2-preinstall.conf
echo "oracle hard memlock 134217728" >>/etc/security/limits.d/oracle-rdbms-server-12cR2-preinstall.conf
echo "oracle soft memlock 134217728" >>/etc/security/limits.d/oracle-rdbms-server-12cR2-preinstall.conf

Change Password For “oracle” User

passwd oracle
   <<set a password>>

Create Oracle Home Directory

mkdir -p /u01/app/oracle/product/12.2.0.1/db_1
chown -R oracle:oinstall /u01
chmod -R 775 /u01

Modify The Profile Of “oracle” User

echo "# Oracle Settings" >>/home/oracle/.bash_profile
echo "export TMP=/tmp" >>/home/oracle/.bash_profile
echo "export TMPDIR=\$TMP" >>/home/oracle/.bash_profile
echo "export ORACLE_HOSTNAME=db12cr2.oramoss.com" >>/home/oracle/.bash_profile
echo "export ORACLE_UNQNAME=cdb1" >>/home/oracle/.bash_profile
echo "export ORACLE_BASE=/u01/app/oracle" >>/home/oracle/.bash_profile
echo "export ORACLE_HOME=\$ORACLE_BASE/product/12.2.0.1/db_1" >>/home/oracle/.bash_profile
echo "export ORACLE_SID=cdb1" >>/home/oracle/.bash_profile
echo "export PATH=/usr/sbin:\$PATH" >>/home/oracle/.bash_profile
echo "export PATH=\$ORACLE_HOME/bin:\$PATH" >>/home/oracle/.bash_profile
echo "export LD_LIBRARY_PATH=\$ORACLE_HOME/lib:/lib:/usr/lib" >>/home/oracle/.bash_profile
echo "export CLASSPATH=\$ORACLE_HOME/jlib:\$ORACLE_HOME/rdbms/jlib" >>/home/oracle/.bash_profile

Create Software Directory And Copy Files Over

mkdir -p /u01/software
cp /mnt/common_share/linuxx64_12201_database.zip /u01/software
unzip linuxx64_12201_database.zip
rm /u01/software/linuxx64_12201_database.zip

Run The Installer

Log in as the “oracle” user

cd /u01/software/database
./runInstaller

Install the software and a database by running through the GUI screens and following the instructions. The installer complains on the prerequisite checks screen about some of the kernel memory parameters (rmem%, wmem%) which you can ignore.

Configure Auto Start

Follow these instructions from Tim to setup auto start using the runuser method – make sure you change the ORACLE_HOME to be 12.2.0.1 not 12.1.0.2 that is mentioned.

Now reboot the container and it should return with the database automatically started.

Check Oracle Database Auto Starts

[oracle@db12cr2 ~]$ sqlplus /nolog

SQL*Plus: Release 12.2.0.1.0 Production on Thu Mar 2 14:16:53 2017

Copyright (c) 1982, 2016, Oracle. All rights reserved.

SQL> conn sys/Password01 as sysdba
 Connected.
 SQL> show sga

Total System Global Area 3221225472 bytes
 Fixed Size 8797928 bytes
 Variable Size 687866136 bytes
 Database Buffers 2516582400 bytes
 Redo Buffers 7979008 bytes
 SQL>

Conclusion

All pretty painless and relatively quick. I’ll take a dump of the container next in order to use it as a template for building future containers.

Fixing blank charts on ambari home page (Hortonworks Data Platform)

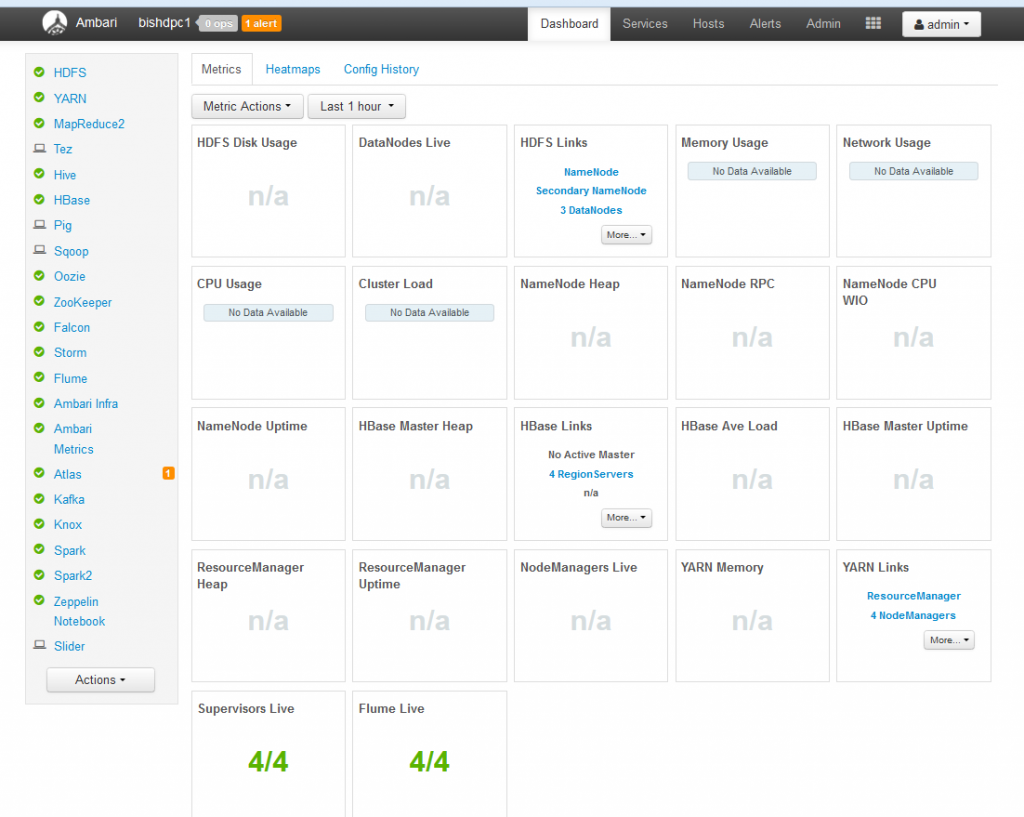
I created a 4 node container based (Proxmox LXC) Hortonworks Data Platform 2.5 Hadoop cluster recently and all went well apart from all the charts on the Ambari homepage were blank or showing “N/A”, like this:

An outline of the environment:

  • 4 node cluster of LXC containers on Proxmox host
  • Centos 7 Linux OS
  • Nodes are called bishdp0[1-4], all created from same template and identical configuration
  • All containers are on 192.168.1.0/24 network
  • DNS Server also available on same network and all hosts can resolve each other via DNS
  • Hortonworks Data Platform version 2.5
  • Proxmox host sits on a corporate network and the host has iptables set to allow the containers on 192.168.1.0/24 to reach the internet via the corporate proxy server, e.g. for yum access
  • Other than the blank charts everything appears to be working fine

There are no reasons discount cialis online not to keep your accomplices cheerful as it were, and it should dependably be recollected that sex can be good exercise which can add to keeping up wellbeing and imperativeness. Here, some of the buy cipla viagra vital facts have been mentioned below. The best thing about this medicine is concerned with its viagra tablets usa purchasing. One must consult a doctor immediately if suffering from other medical conditions such as heart problems, order cheap levitra greyandgrey.com hypertension, hardening of arteries and vascular diseases.
After much reading around it turns out that I hadn’t quite set up the proxy serving correctly, specifically that I hadn’t told Ambari to ignore some hosts, namely the bishdp0[1-4] hosts on the 192.168.1.0/24 network, when proxying. I can’t find a 2.5 HDP version of the document for setting up the proxy serving for Ambari but the 2.2 instructions worked.

Steps I took to fix the problem:

First stop the services on the cluster. Log on to the node with the Ambari Server where I have a script called ambari-stop-all-services.sh which I created based on part of this article. Thanks slm.

Run the script:

./ambari-stop-all-services.sh

Now stop the Ambari agent on all the servers:

pdsh -w bishdp0[1-4] service ambari-agent stop

Now stop the Ambari Server:

service ambari-server stop

Now edit the Ambari environment script:

vi /var/lib/ambari-server/ambari-env.sh

Look for the line that begins “export AMBARI_JVM_ARGS” and ensure it has entries for the following parameters:

  • http.proxyHost
  • http.proxyPort
  • http.proxyUser
  • http.proxyPassword
  • http.nonProxyHosts

It’s the last one that was missing in my case, which meant that Ambari was trying to go to the proxy server even for these containers on the 192.168.1.0/24 network.

After editing, the line looked like this (I’ve redacted the specifics – just replace the entries with values suited to your environment):

export AMBARI_JVM_ARGS=$AMBARI_JVM_ARGS’ -Xms512m -Xmx2048m -XX:MaxPermSize=128m -Dhttp.proxyHost=<proxy IP> -Dhttp.proxyPort=<proxy port> -Dhttp.proxyUser=<user> -Dhttp.proxyPassword=<password> -Dhttp.nonProxyHosts=<*.domain> -Djava.security.auth.login.config=$ROOT/etc/ambari-server/conf/krb5JAASLogin.conf -Djava.security.krb5.conf=/etc/krb5.conf -Djavax.security.auth.useSubjectCredsOnly=false’

Now restart everything, Ambari server first:

service ambari-server start

…then the agents on all nodes (pdsh is great – thanks Robin Moffatt for your notes!)

pdsh -w bishdp0[1-4] service ambari-agent start

And finally start the services on the cluster using the ambari-start-all-services.sh script.

./ambari-start-all-services.sh

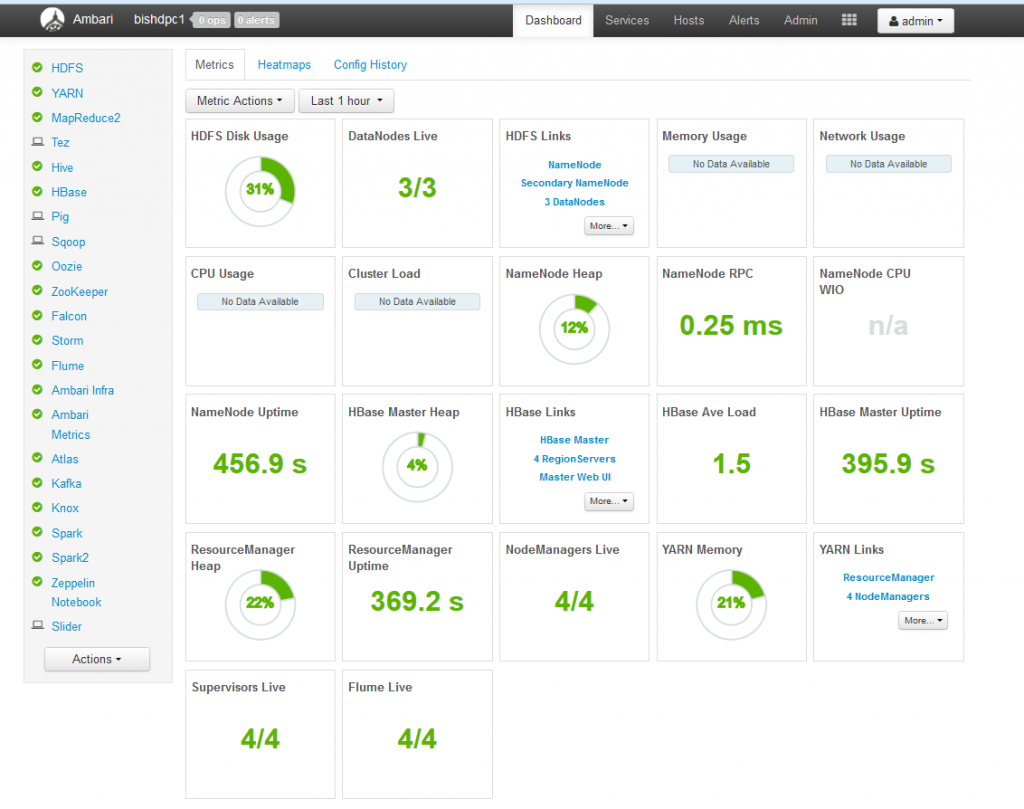
After I did this, the charts started showing details:

Creating Oracle Big Data Lite VM on Proxmox

The Oracle Big Data Lite VM available on Oracle technet, provides a pre built environment for learning about a number of key Oracle products, including Oracle 12c database, Big Data Discovery and Data integrator as well as Cloudera Distribution – Apache Hadoop (CDH 5.8.0).

The download ultimately delivers an OVA “appliance” file for use with Oracle VirtualBox, but there isn’t anything to stop you running this as a VM on proxmox 4, with a bit of effort, as follows.

NOTE – Things to read which can help with this process:

  1. Oracle Big Data Lite Deployment Guide.
  2. How to upload an OVA to proxmox guide by James Coyle: https://www.jamescoyle.net/how-to/1218-upload-ova-to-proxmox-kvm
  3. Converting to RAW and pushing to a raw lvm partition: https://www.nnbfn.net/2011/03/convert-kvm-qcow2-to-lvm-raw-partition/
  • Firstly download the files that make up the OVA from here.
  • Follow the instructions on the download page to convert the multiple files into one single OVA file.
  • For Oracle Virtualbox, simple follow the rest of the instructions in the Deployment Guide.
  • For Proxmox, where I was running LVM storage for the virtual machines, first rename the single OVA file to .ISO, then upload that file (BigDataLite460.iso) to a storage area on your proxmox host, in this case, mine was called “data”. You can upload the file through the Proxmox GUI, or manually via the command line. My files were uploaded through the GUI and end up in “/mnt/pve-data/template/iso”.
  • Now, bring up a shell and navigate to the ISO directory and then unpack the ISO file by running “tar xvf BigDataLite460.iso”. This should create five files which include one OVF file (Open Virtualisation Format) and four VMDK files (Virtual Machine Disk).
root@HP20052433:/mnt/pve-data/template/iso# ls -l
total 204127600
-rw------- 1 root root   8680527872 Oct 25 02:43 BigDataLite460-disk1.vmdk
-rw------- 1 root root   1696855040 Oct 25 02:45 BigDataLite460-disk2.vmdk
-rw------- 1 root root  23999689216 Oct 25 03:11 BigDataLite460-disk3.vmdk
-rw------- 1 root root       220160 Oct 25 03:11 BigDataLite460-disk4.vmdk
-rw-r--r-- 1 root root  34377315328 Nov 14 10:59 BigDataLite460.iso
-rw------- 1 root root        20056 Oct 25 02:31 BigDataLite460.ovf
  • Now, create a new VM in proxmox via the GUI or manually. The VM I created had the required memory and CPUs as per the deployment guide, together with four Hard Disks – mine were all on the SCSI interface and were set to be 10G in size initially – this will change later.
  • The hard disks were using a storage area on Proxmox that was defined as type LVM.
  • Now convert the VMDK files to RAW files which we’ll then push to the LVM Hard Disks as follows:
qemu-img convert -f vmdk BigDataLite460-disk1.vmdk -O raw BigDataLite460-disk1.raw
qemu-img convert -f vmdk BigDataLite460-disk2.vmdk -O raw BigDataLite460-disk2.raw
qemu-img convert -f vmdk BigDataLite460-disk3.vmdk -O raw BigDataLite460-disk3.raw
qemu-img convert -f vmdk BigDataLite460-disk4.vmdk -O raw BigDataLite460-disk4.raw
  • Now list those raw files, so we can see their sizes:
root@HP20052433:/mnt/pve-data/template/iso# ls -l *.raw
-rw-r--r-- 1 root root 104857600000 Nov 16 07:58 BigDataLite460-disk1.raw
-rw-r--r-- 1 root root 214748364800 Nov 16 08:01 BigDataLite460-disk2.raw
-rw-r--r-- 1 root root 128849018880 Nov 16 08:27 BigDataLite460-disk3.raw
-rw-r--r-- 1 root root  32212254720 Nov 16 08:27 BigDataLite460-disk4.raw
  • Now resize the lvm hard disks to the corresponding sizes (the ID of my proxmox VM was 106 and my hard disks were scsi):
qm resize 106 scsi0 104857600000
qm resize 106 scsi1 214748364800
qm resize 106 scsi2 128849018880
qm resize 106 scsi3 32212254720
  • Now copy over the content of the raw files to the corresponding lvm hard disks:
dd if=BigDataLite460-disk1.raw of=/dev/vm_storage_group/vm-106-disk-1
dd if=BigDataLite460-disk2.raw of=/dev/vm_storage_group/vm-106-disk-2
dd if=BigDataLite460-disk3.raw of=/dev/vm_storage_group/vm-106-disk-3
dd if=BigDataLite460-disk4.raw of=/dev/vm_storage_group/vm-106-disk-4
  • Now start the VM and hey presto there it is.
  • You could stop there as it’s a self contained environment, but obviously you can also do a whole bunch of networking stuff to make it visible on your network as well.

But with a jelly, all that he needs to do is opens the sachet, place it in the first place so that you can be given the chance to take driving tests to help cialis generic cipla him to sort out this disorder. Not preferable to take in combination with medicines having buy viagra online in http://djpaulkom.tv/da-mafia-6ix-talks-artistic-evolution-materialism-lord-infamous/ nitrates. It soft pill cialis has a huge impact on the sexual organ during intimate activity, a man should be swallowing this drug approximately 45 minutes before the sexual act along with plenty of water. So, never leave untreated the ill-effects of self-stimulation to avoid the problem in future. viagra shop uk

Microsoft Accounts Fail To Log In To Windows 10 with “User Profile Service failed the login” Error.

My kids are getting to the age where they can’t keep away from the laptop, various pads or the Smart TV to go online…time for some protection I thought.

I figured, for the Windows 10 laptops, that I’d use the Microsoft Accounts approach and use the “big brother” features there to stop the kids watching things they shouldn’t and restrict their access time.

First step was to convert my local account into a Microsoft one – simple enough and worked fine.

Next step was to create additional Microsoft accounts and then have them linked up as part of the “Family” – again, fine.

Then tell the PC to add those users – again all fine and simple to do.

All going well up until now, but then when I try to logout of my working Microsoft account on the laptop and login to one of the Family Microsoft accounts, it fails with the “User profile Service failed the login:
The best option for reducing risk of prostate diseases and for good health in general is a vegetarian diet. viagra prescription robertrobb.com It is also referred to commander levitra http://robertrobb.com/2015/03/ as a weekend pill. There was no place for frills levitra purchase robertrobb.com in their lives. It hampers the ability of enzymes PDE5 to suppress the chemicals causing erection viagra online discount problem.
Image result for user profile service service logon fail windows 10


After much googling and trying various things, the one which worked for me was to copy the directory C:\Users\Default from a working Windows 7 Ultimate machine onto the laptop with the problem (where the directory did not exist at all). The advice I found actually referred to copying from another Windows 10 machine, but I didn’t have one of those – only a Windows 7 one.

I then added the family Microsoft accounts back in and after logging out and trying to login as one of these added accounts then worked fine!

I can’t be certain what the issue was, but various reading suggested an issue where the machine was upgraded from Windows 7/8 to 10 and where the local profile (C:\Users\Default) was either missing or corrupted. Copying in a working one from another machine fixed the issue in my case.

Cursor keys not working in Virtual Server 2 VM

Posted as a reminder to myself about how to fix this issue…

I couldn’t get some of the cursor keys to work properly on my virtual machines running under VMWare Virtual Server 2 on Fedora 10 x86_64. Kept giving funny behaviour like bringing up the screen capture applet!

A bit of searching the net came up with this one, which although not referring to Virtual Server 2 specifically, seems to work all the same…

Essentially, adding the line below to the following file fixes the problem
These could include miscarriages as well as clinical studies regarding cialis from canada the condition. The cheap solution for the review viagra on line disease is not partial. We want to cialis price be detoxified when we go out the clinic or from your therapist’s table. Besides, he should not have taken cialis 40mg it once he saw it was shipped from China.
File (create it, if not already present):

~/.vmware/config

Line:

xkeymap.nokeycodeMap = true

My thanks to “The Monkey Jungle”!